
Auto Attendance
The Auto Attendance tab is the main hub for live monitoring. It shows a table of all participants in the meeting with their current statuses, and provides summary counts for quick decision-making.
Summary Bar (Top)
Section titled “Summary Bar (Top)”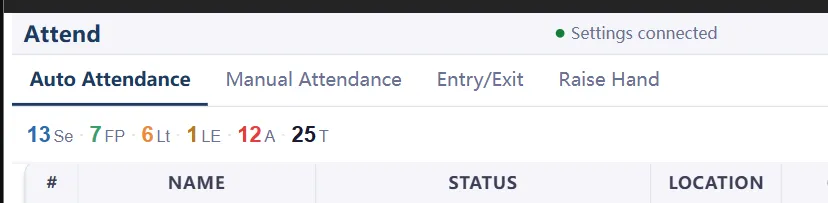 Summary bar showing counts of each status
At the very top, you’ll see color-coded summary counts:
- Seen
- Full Present
- Late
- Left Early
- Returned
- Absent (Roster Mode only)
- Ignored (Guests and Unmatched participants, Roster Mode only)
Status Reference
Section titled “Status Reference”Generic Mode (No Roster)
Section titled “Generic Mode (No Roster)”- Seen (dark blue): Participants that have been in the meeting at some point (even if currently away).
- Full Present (green): Participants that are currently in the meeting and have been present for the entire duration.
- Late (yellow/orange): Participants who arrived after the late threshold.
- Left Early (yellow/brown): Participants who left before the meeting ended.
- Returned (blue): Participants who were away for a period, then came back.
In Generic Mode, Absent, Guest, and Unmatched statuses are not applicable since there is no roster to compare against.
Roster Mode (Roster Loaded)
Section titled “Roster Mode (Roster Loaded)”In Roster Mode, you also have:
- Absent (red): Expected participants who have not yet appeared.
Guest and Unmatched participants are tracked separately in the summary bar but not listed in the main participant table since they are not part of the roster.
To see who the unmatched/guest participants are, use the Name Matching subtab under Auto Attendance.
Sub-tabs
Section titled “Sub-tabs”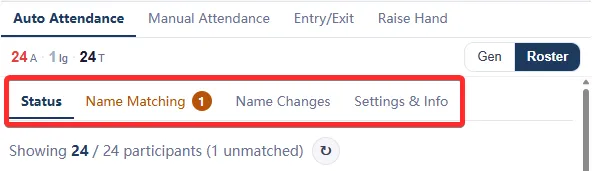 Auto Attendance sub-tabs
Status tab (default)
Section titled “Status tab (default)”Status tab is the main view showing all participants and their current statuses. This is where you monitor live attendance throughout the meeting.
Filter, Sort, and Search
Section titled “Filter, Sort, and Search”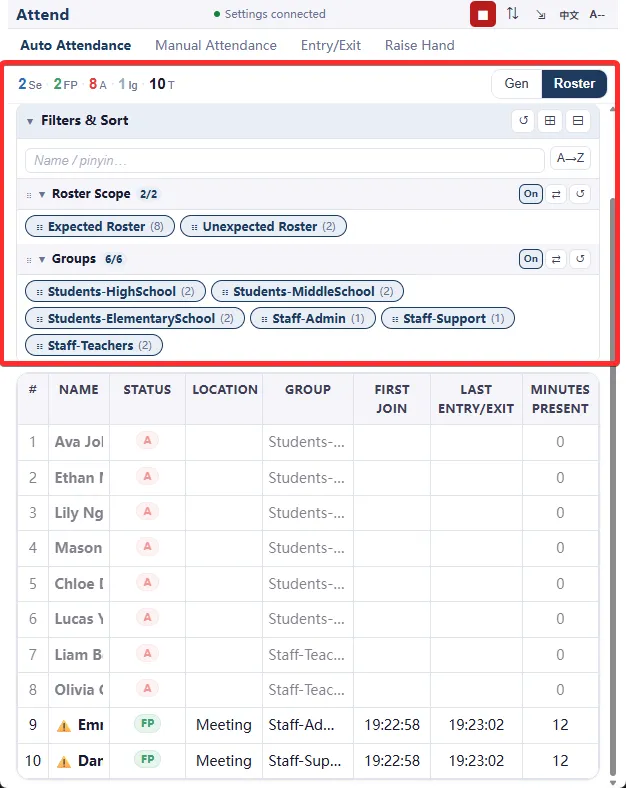 Filter and sort options above the participant table
In Roster Mode, you can filter, sort, and search the participant table to focus on specific groups or people:
- You can filter by:
- Group (if roster groups exist)
- Roster Scope (if unexpected participant from the roster joined)
- Status (by clicking the summary counts at the top)
- Search by name or pinyin
- You can sort alphabetically by name within each group.
- Filters can be combined, or individually bypassed.
Participant Table (Main Area)
Section titled “Participant Table (Main Area)”Below the summary bar, you’ll see a scrollable table with one row per participant:
| Column | What It Shows | Example |
|---|---|---|
| Name | Participant’s display name or matched roster name. | ”John Wang” or “李明” |
| Status | Current status with a colored chip. | ”Seen” (dark blue), “Full Present” (green) |
| Location | Whether they are currently in the Meeting or Waiting Room. | ”Meeting” or “Waiting Room” |
| Group | The roster group they belong to (if in Roster Mode). | ”Team A” |
| First Join | When the participant joined. | ”12:05” |
| Last Entry/Exit | The most recent join or leave time. | ”14:45” |
| Minutes Present | How long they’ve been in the meeting. | ”15 minutes” |
Name Matching sub-tab
Section titled “Name Matching sub-tab”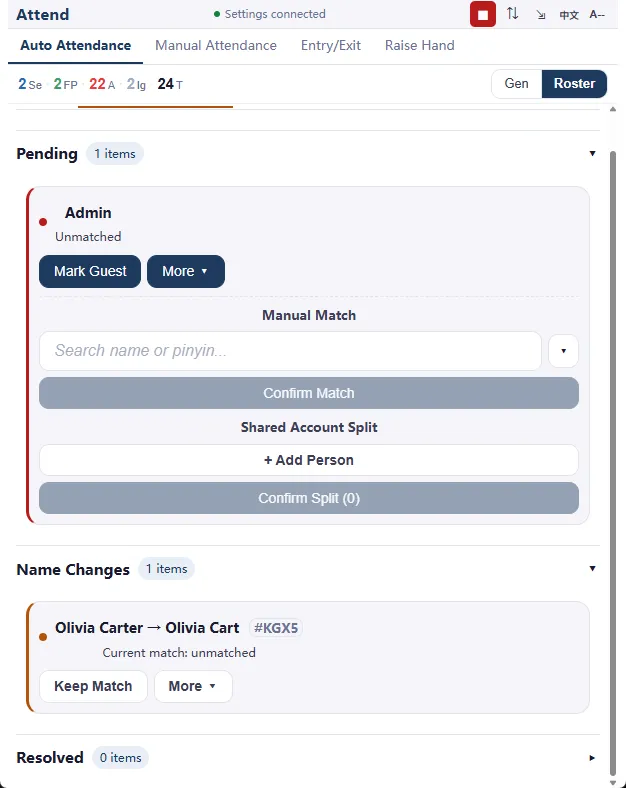 Name Matching sub-tab showing unmatched participants
When you have a roster loaded, the Name Matching sub-tab shows you any unmatched participants (those in the meeting but not matched to a roster entry) so you can take actions.
Sometimes a participant may change name after joining. Name changing may cause them to become matched or unmatched depending on the new name and your Name Matching rules. The Name Matching sub-tab helps you track and confirm these changes in real time.
Actions You Can Take
Section titled “Actions You Can Take”For unmatched participants:
- Mark Guest: ignore this participant for attendance purposes
- More
- Manually Match: If you know who this participant is, you can manually match them to a roster entry.
- Shared Account Split: If this participant is a shared account (e.g., “iPhone”, “Anna & Bob”) that multiple people are using, you can split it into multiple entries to track them together.
For name changes:
- Confirm Match: AttendFlow automatically tries to detect a name change and match to the original participant.
- More
- Manually Match: Same as above.
- Split Shared Account: Same as above.
You can revert any of these actions if you make a mistake under the “Resolved” section of the Name Matching sub-tab.
Status and persistence behavior of Name Matching actions:
Section titled “Status and persistence behavior of Name Matching actions:”| Action | Adds to participant Auto Attendance table? | Adds a Name Matching rule? |
|---|---|---|
| Mark Guest | No | No |
| Manual Match | Yes | Yes |
| Confirm Name Change | Yes (if previously or now unmatched) | No |
| Split Shared Account | No | No |
Name Changes
Section titled “Name Changes”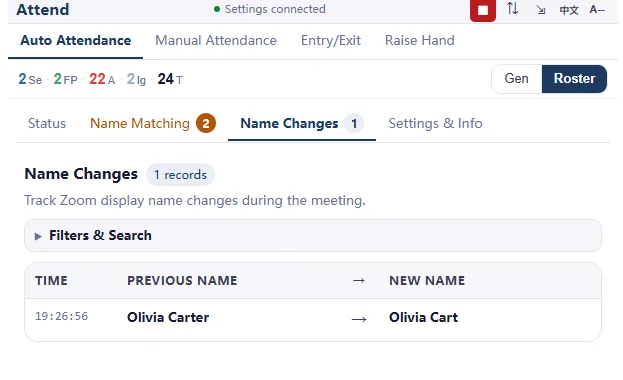 Name Changes sub-tab showing detected name changes
This section shows any participants that have changed their name during the meeting. It shows their original name, new name, and the time of the change. This helps you understand if a name change caused a participant to become unmatched or matched.
Settings & Info
Section titled “Settings & Info”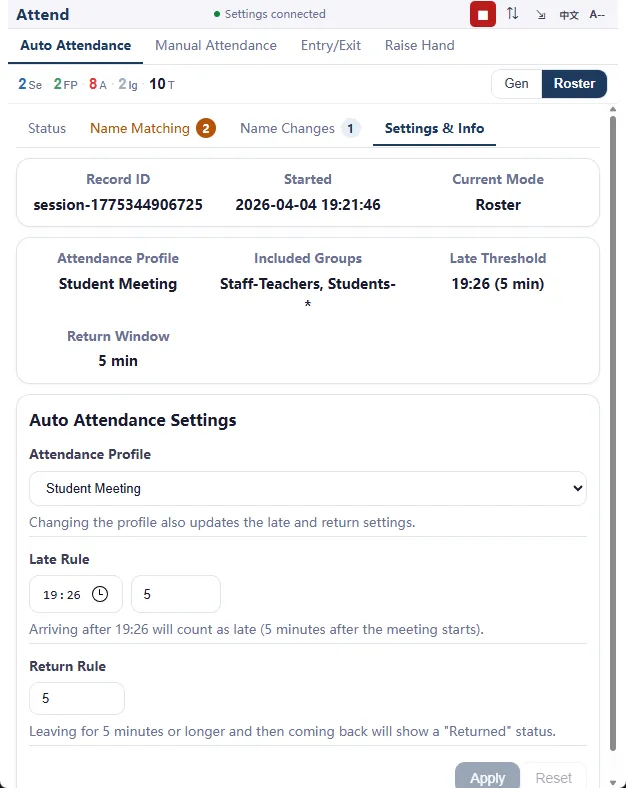 Settings & Info sub-tab showing meeting information and settings
This section shows information about the current meeting and attendance record, including the current Attendance Profile applied to the meeting, along with key settings like late threshold and return window. You can also change the Attendance Profile and other settings from this tab if needed.
Information Displayed
Section titled “Information Displayed”- Record ID: Unique identifier for this meeting’s attendance record.
- Started: When the meeting started.
- Current Mode: Generic or Roster.
- Attendance Profile: The name of the currently applied Attendance Profile (if any).
- Included Groups: Which roster groups are expected for this meeting (Roster Mode only).
- Late Threshold: How many minutes after meeting start before someone is marked “Late”.
- Return Window: How long someone can be away before re-joining is marked “Returned”.
Settings You Can Change
Section titled “Settings You Can Change”-
Attendance Profile: Changing a Profile will also update the Late Threshold, Return Window, and Included Groups according to the new profile’s settings.
-
Late Threshold: Adjust how many minutes after meeting start before someone is marked “Late”.
-
Return Window: Adjust how long someone can be away before re-joining is marked “Returned”.
Troubleshooting Auto Attendance
Section titled “Troubleshooting Auto Attendance”| Issue | Likely Cause | Solution |
|---|---|---|
| Participant not appearing | They haven’t joined yet, or Zoom hasn’t synced their data to the app. | Wait a few seconds; the list updates every few seconds. |
| Status not updating | The app may have stalled or lost connection. | Click the Refresh button above the table. |
| Everyone shows “Unmatched” | Name Matching rules weren’t loaded, or the app is in Generic Mode. | Check Settings Panel to verify Name Matching rules are configured. |
| Table is too small to read | UI size setting needs adjustment. | Use the button on the Meeting Panel top toolbar to adjust UI size. Go to Other Settings to set default Meeting UI Size. |
Next Steps
Section titled “Next Steps”- Want to take manual attendance records? → Manual Attendance Tab
- Need exact join/leave times? → Entry/Exit Tab
- Tracking raised hands? → Raise Hand Tab
- After the meeting, export records → Attendance Records
Related Links
Section titled “Related Links”- Meeting Panel Overview – Understand all four tabs.
- Manual Attendance Tab – Capture attendance checkpoints.
- Entry/Exit Tab – Review exact join/leave times.
- Name Matching Workflow – Set up accurate name mappings.
- Other Settings – Adjust UI size and export defaults.